Are you ready to add a pop of color to your manicure routine? If you’ve been scrolling through social media lately, you’ve probably noticed that rainbow nail art is taking over feeds faster than you can say “polish.” It’s like giving your fingertips a miniature paint palette and letting your creativity run wild. Imagine your nails as tiny canvases waiting to be transformed into vibrant masterpieces, each stroke of color telling a story of its own. From subtle gradients to bold geometric patterns, the possibilities are as endless as the colors in the sky after a storm. So, why settle for a plain old manicure when you can wear a rainbow on your fingertips? Let’s dive into the world of rainbow nail art and explore the kaleidoscope of designs waiting to adorn your nails with brilliance and flair.
Basic Rainbow Nail Art Techniques
 Alright, let’s start by gathering our nail art arsenal! To create a mesmerizing rainbow gradient, you’ll need a few trusty tools and materials. First up, grab your favorite base coat to lay down a smooth foundation. Think of it like priming a canvas before painting a masterpiece—it ensures your colors pop and last longer. Next, pick out your rainbow-colored nail polishes. You can opt for traditional shades like red, orange, yellow, green, blue, and purple, or mix it up with pastels or neons for a playful twist. Don’t forget a good-quality makeup sponge—it’s your secret weapon for blending colors seamlessly.
Now, let’s dive into the fun part: creating that gorgeous rainbow gradient! Start by applying your base coat and letting it dry completely. Then, line up your polishes in the order of the rainbow. With a small piece of sponge, paint thin stripes of each color onto the sponge, slightly overlapping them. Now, gently dab the sponge onto your nail in a rolling motion, gradually building up the colors from cuticle to tip. Repeat this process until you achieve the desired intensity of colors. Voila! You’ve just created your own mini rainbow on your nails.
To ensure your rainbow gradient looks polished and professional, here are a few tips to keep in mind. Always work in thin layers to prevent the polish from becoming too thick or gloopy. And don’t rush—patience is key to achieving smooth transitions between colors. If you make any mistakes, don’t sweat it! A clean-up brush dipped in acetone can work wonders for tidying up around the edges. Lastly, seal the deal with a glossy top coat to protect your masterpiece and add extra shine. With a little practice and a lot of creativity, you’ll be rocking flawless rainbow gradients like a pro in no time!
Creative Rainbow Nail Art Designs
Let’s dive into the colorful world of creative rainbow nail art designs! From classic French tips to intricate geometric patterns, there’s a style to suit every mood and personality.
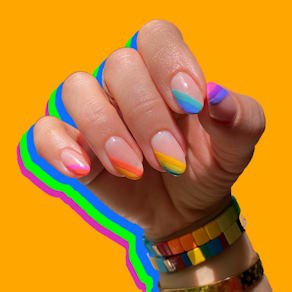
First up, let’s talk about Rainbow French Tips. Picture this: a timeless manicure with a vibrant twist. Instead of the usual white tips, Rainbow French Tips add a pop of color to the classic look. To create this design, start by painting your nails with a clear base coat. Then, using a thin brush or nail tape, carefully apply rainbow stripes to the tips of your nails. You can opt for a uniform rainbow or mix it up with different color combinations. Once dry, seal the design with a glossy top coat for a polished finish. Feeling adventurous? Experiment with glitter or rhinestone accents for a touch of sparkle!
Next on our list is Rainbow Ombre—a dreamy gradient of colors fading seamlessly into each other. To achieve this look, start by painting your nails with a white base coat. Then, using a makeup sponge, dab on layers of rainbow-colored polish from cuticle to tip. Blend the colors together gently for a smooth transition. Pro tip: start with lighter shades and build up to darker ones for a gradient effect. Finish with a top coat to lock in the colors and add shine. With Rainbow Ombre nails, you’ll feel like you’re wearing a rainbow sunset on your fingertips!
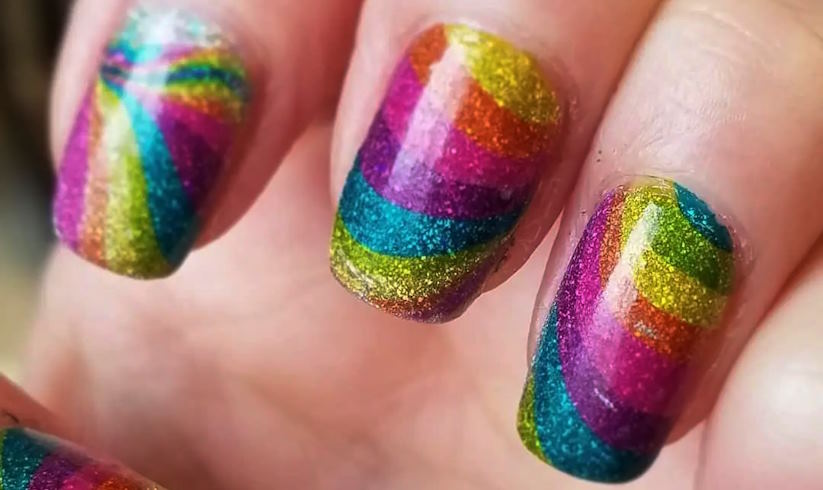
 Now, let’s explore Rainbow Geometric Patterns—a modern twist on nail art inspired by geometric shapes and lines. From bold stripes to intricate triangles, the possibilities are endless. To create geometric designs, you’ll need a steady hand and some patience. Start by painting your nails with a base color, then use thin nail brushes or striping tape to create geometric shapes in rainbow hues. Play around with different patterns and angles to find your signature style. Whether you’re a minimalist or a maximalist, Rainbow Geometric Patterns are sure to make a statement wherever you go!
Last but not least, let’s talk about Rainbow Nail Stamping—a fun and easy way to add intricate designs to your nails. Nail stamping involves transferring pre-designed images onto your nails using a stamping plate and a special polish. Look for stamping plates with rainbow-themed designs like clouds, rainbows, or unicorns for a whimsical touch. Simply apply the polish to the desired design on the plate, scrape off the excess, then transfer it onto your nails with a rolling motion. Finish with a top coat to seal the design and voila! You’ve got yourself a rainbow masterpiece that’s sure to turn heads wherever you go.
Tips for Maintaining Rainbow Nail Art
Alright, let’s keep those rainbow nails looking fresh and fabulous for as long as possible! Here are some handy tips to help you maintain your colorful manicure:
First off, let’s talk about preserving the longevity of your rainbow nail designs. To keep your colors vibrant and chip-free, be sure to apply a top coat every few days. This will not only add shine but also provide an extra layer of protection against everyday wear and tear. And remember, avoid exposing your nails to harsh chemicals like household cleaners or acetone-based nail polish removers, as these can dull or damage your beautiful rainbow hues.
Now, let’s chat about touch-ups and repairs. Accidents happen, and sometimes a chip or smudge can threaten to ruin your nail art masterpiece. But fear not! Keep a small nail art brush and some matching nail polish handy for quick touch-ups. Simply dab a bit of polish onto the brush and carefully fill in any areas where the color has chipped or smudged. It’s like giving your nails a mini makeover!